The great thing about Microsoft business applications is that they seamlessly integrate with each other. If you’re a Power Virtual Agents user, this means you can build and test your own chatbot or virtual agent within Microsoft Teams. Once you’ve built your Power Virtual Agent, it’s now time to publish and share it with others. In this post, I’ll describe how you can share your bot with all colleagues using the ‘Share link’ option.
Publishing your bot
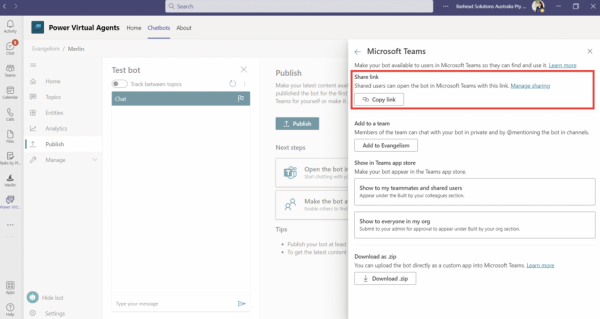
First of all, you’ll need to go to the Publish area of PVA in Teams and ‘Publish’ your bot. Then, click ‘Make the bot available to others’. If you publish a change to your bot, users with the bot already installed will need to type ‘Start over’ in the chat with the bot in order to see the changes. Once you publish the changes, it’s a good idea to build a flow sending a proactive message from the bot to the users, letting them know about this.
Note: if you only make a change to a Power Automate flow used in your bot, this does not require the bot to be republished in order to take effect.
Click on the ‘Availability Options’ button to see the different ways you can share your bot.

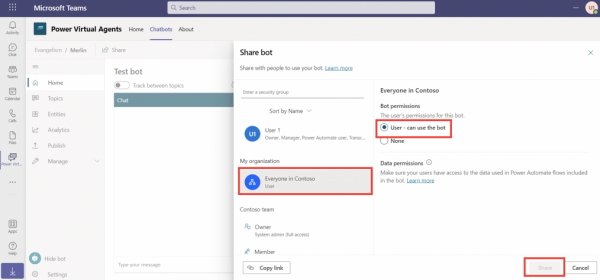
Before you share the link, you will need to manage the sharing settings if you intend for everyone in your organisation to use the bot. By default, only members of the Team your bot is created in will have access to it. For example, if you share your bot via a link, only users in the same Team as the bot be able to see it. Everyone else would get an ‘App not found’ error. So, if you intend for everyone in your organisation to use the bot, you will need to grant them access.

.
Change the bot sharing settings so that everyone in your organisation is a user
You can click ‘Manage sharing’ to invite users. Alternatively, you can also bring up the manage sharing options by clicking the ‘Share’ button in the top right corner of the PVA Home screen. So that the sharing link works for everyone, click on the ‘Everyone in Organisation’ option, switch the bot permissions to ‘User – can use the bot’ and click ‘Share’. If you intend to use the ‘Show in Teams app store’ sharing options, sharing is handled via security groups. You will need to enter the security groups that contain the users for bot.
.
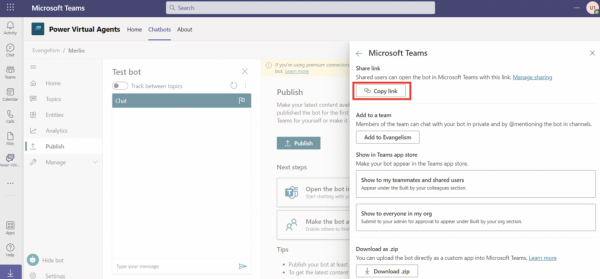
Now that everyone in your organisation has been granted access, you can get them to install the bot by the link. Simply click ‘Copy Link’ in the Publishing area (or sharing menu), and distribute it! When your colleagues click on the link you give them, they will see the bot and be prompted to add it.

Learn how to create low-code, no-code virtual agents
Virtual agents are one of the key tools enabling cross-team collaboration in organisations. As traditional employee roles change and industries evolve, they will become more of a necessity. If you want to learn how to build and deploy virtual agents, Barhead offers Power Virtual Agents in a Day. During this instructor-led hands-on workshop, you will learn how to design and develop a virtual agent using a no-code graphical interface. To learn more about Barhead’s Power Platform workshops, visit our website.
About the Author: Rishona Elijah
Rishona is a Microsoft Certified Trainer and Power Platform expert at Barhead Solutions. As a Tech Evangelist, she explores the latest innovative technology from Microsoft and demonstrates how this technology can transform business users’ work. Rishona loves to see business users attending training sessions and is constantly amazed by what can be achieved using Microsoft’s low-code no-code technology.


