The most common way to create and attach documents to your emails is to do it manually. While that may seem like the easiest way to do it for some, there is actually a way to digitalise and automate it through Power Automate and Dataverse. One of the four components of Microsoft’s Power Platform, Power Automate enables users to build automated workflows for repetitive manual tasks such as sending emails and setting reminders. On the other hand, Dataverse (formerly known as the Common Data Service) is a secure, scalable and low-code data platform that can serve multiple apps and services.
By bringing these two robust Microsoft technologies together, users can significantly increase the efficiency of generating and attaching document templates for emails. This method allows users to directly track the email and set its “Regarding” field to a specific Dynamics 365 record automatically. This is more efficient than manually sending emails via Outlook, where manual intervention is needed to set the “Regarding” via the Dynamics 365 App for Outlook.
Below is a step-by-step guide for this method, divided into two parts. Before diving in, make sure to accomplish the pre-requisites.
Pre-requisites
Through Dynamics 365, users can either create custom document templates or use the ready-made out-of-the-box (OOTB) document templates. Prepare and upload the necessary document templates first. Then, decide on the trigger that will best suit your business requirements. Finally, make sure that you have set up your user’s mailbox successfully and have synchronised it with Dynamics 365. Once these pre-requisites are accomplished, you may proceed with the automation. In this case, the OOTB Order Summary template will be used. The output will be sent to the customer upon creation of their order record.
Create the workflow that will generate your document template
Inside your solution, go to “Processes,” click “New” and set your workflow properties:
- Set the Process Name
- Category: Workflow
- Entity: Order (at least in this example)
- Type: New Blank Process
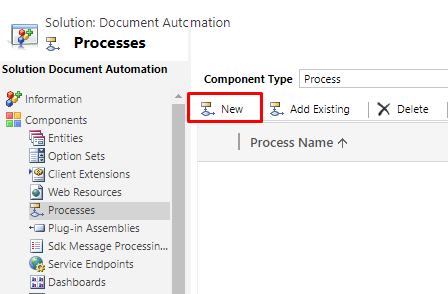
Afterward, set the scope and trigger of your workflow. Set the scope to “Organisation” and configure it to start when “Record is created.”

Click “Add Step” and select “Perform Action.” In the “Action” dropdown list, select “SetWordTemplate” under “Command Actions.”
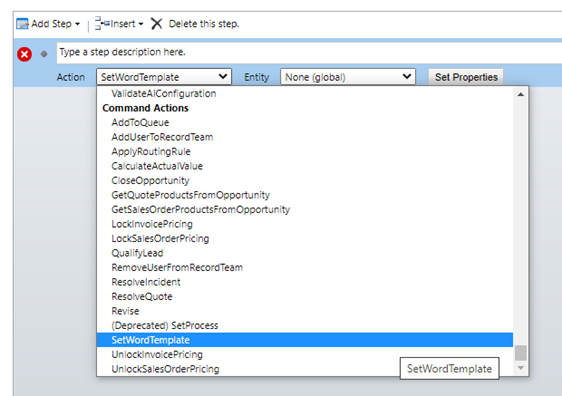
Leave the “Entity” value as “None (global),” then click “Set Properties.”
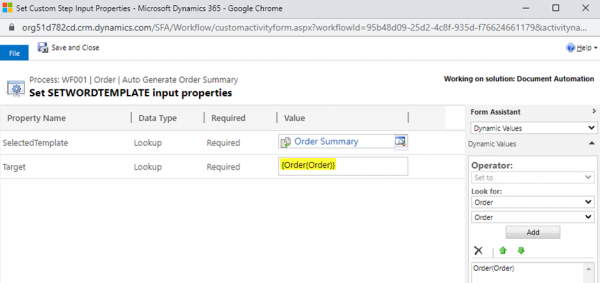
Select the document template you want to generate on the “SelectedTemplate” property, then set the target dynamic entity ID value on the “Target” property.
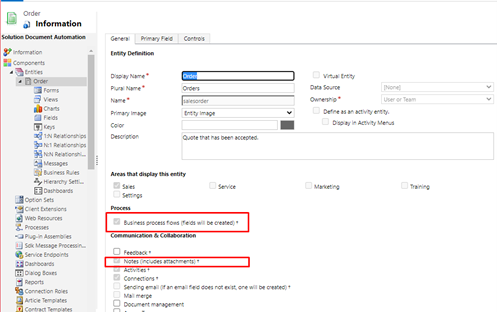
Make sure that Business Process Flows under the “General” tab in the entity properties is ticked so that your target entity will be listed in the Dynamic Values list. Tick “Notes” too, since it is where the document will be attached temporarily.
Upon running this workflow, it creates a “Note” record with the generated document attached to it and the target entity set as “Regarding.”

Create Power Automate flow to attach the autogenerated document to the email as an attachment
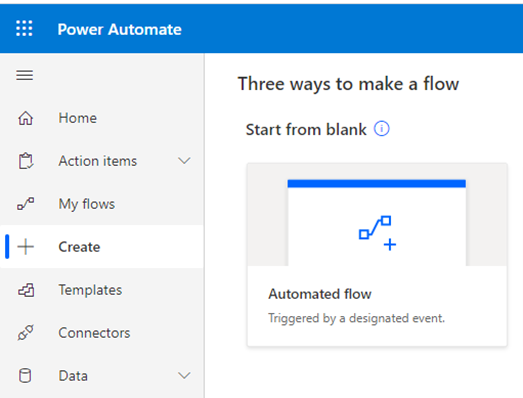
Sign in to Power automate, select your environment, and go to the “Create” tab. Under “Start from Blank,” select “Automated flow.”
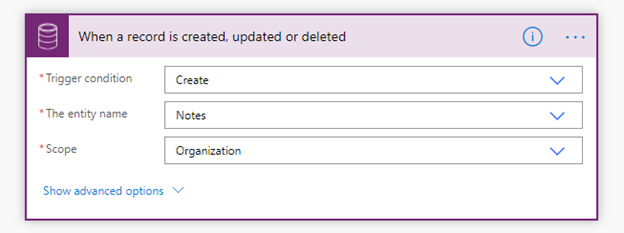
Set the trigger to Common Data Service (current environment) for when a record is created, updated or deleted. Then, set the following trigger properties:
- Trigger condition: Create
- The entity name: Notes
- Scope: Organization
This will trigger the flow after successfully running the workflow that has been created.
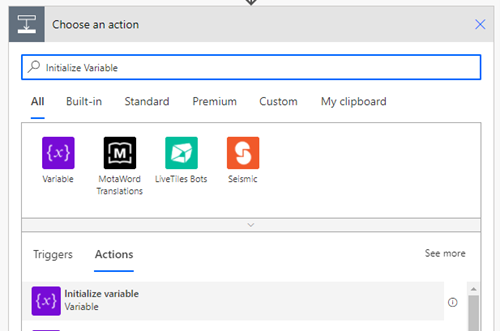
Initialise a string variable to format the email message body. This step is optional and is only for giving the email message body the desired format. Add a new step and search for “Initialise Variable.”
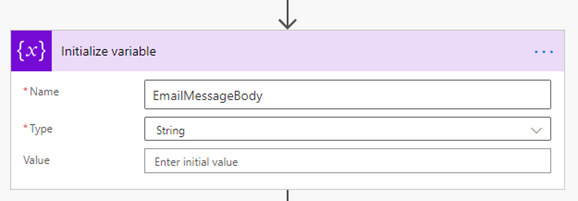
Set variable name to “EmailMessageBody” and set type to “String.”
Add a new step and select “Condition” under the “Actions” tab.
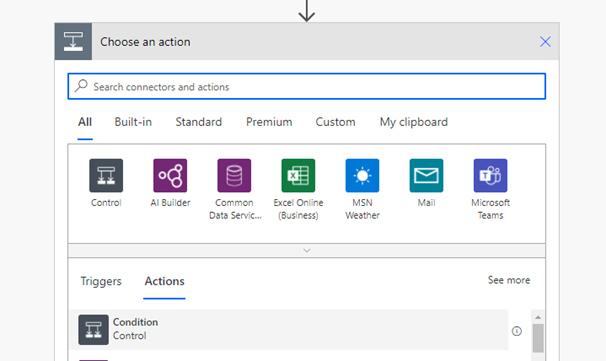
With the “Condition” action, make sure that the correct notes record is being called. The safest way to do this is to check the “File Name” of the Notes attachment.

Under the condition’s “If yes” branch, add a new action and select “Get a record.”
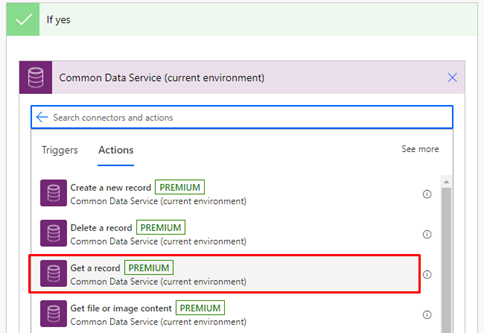
Get the document template’s target record or the value of the previously created Notes record’s “Regarding” field. Use the “Regarding (Value)” from Dynamic 365’s contents.
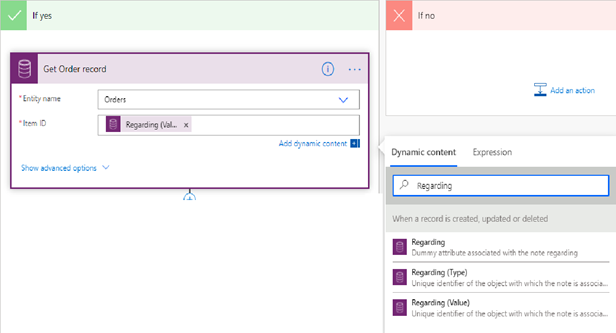
After getting the values of the target entity record, get its related customer/contact record where the email will be sent. To simplify the flow, the customer in this example has been set to contact. To do this, add another “Get a record” step and set the appropriate values.
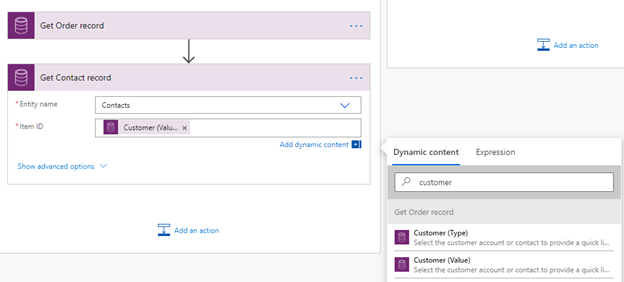
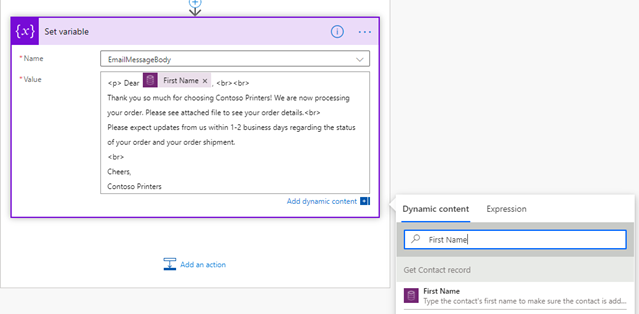
It is good practice to rename your flow actions to avoid confusion especially when you are calling many of the same actions. Add a new “Set Variable” action to set the value of the previously initialized variable for the EmailMessageBody. You can format the email body by using basic html tags.
Create the email message record using Dataverse (current environment)
Set the values for the “To” and “From” attributes.
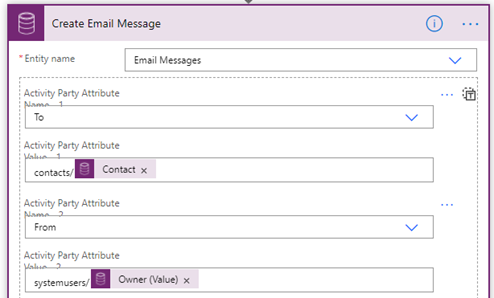
Set other necessary values for the “Description,” “Subject” and “Regarding” fields of the email.


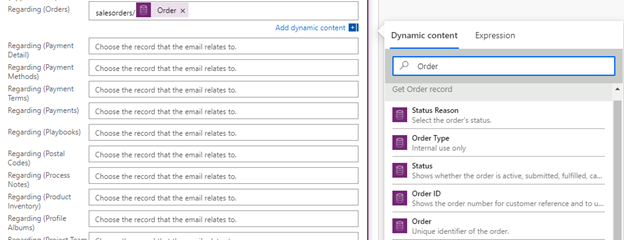
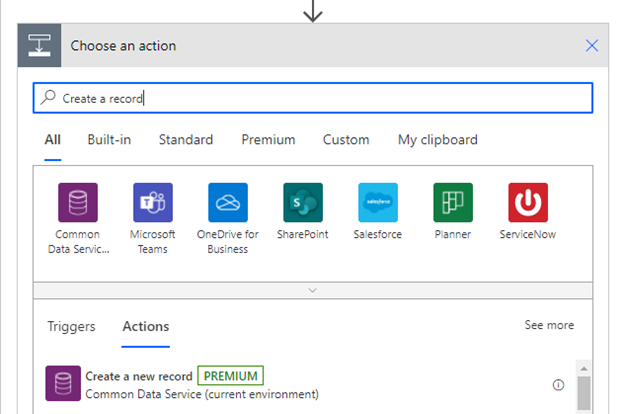
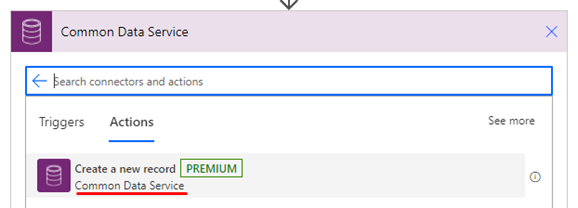
Now that the email is set, the document will now be attached to the email. First, add a new step to “Create a new record.” This time, however, use the old Dataverse connector instead of the Dataverse (current environment).
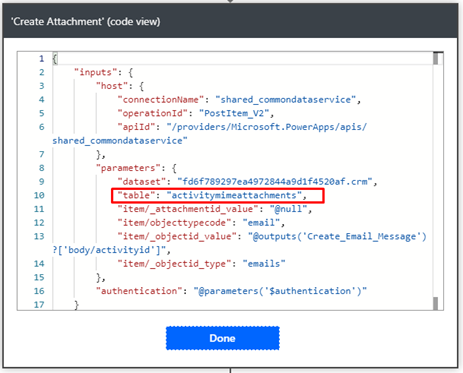
Upon selecting the entity, there will be two Attachments entities on the list. The first one is the “Activity Mime attachment” and the second one is the “Read-only Attachment Entity.” First, select “Activity Mime Attachment.”
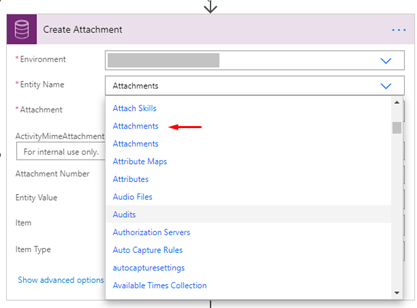
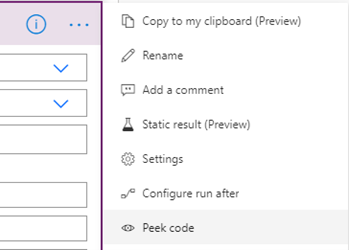
To make sure that the correct entities have been selected, click on the ellipsis at the top-right corner of the Action and select “Peek Code.”
The table value should be “activitymimeattachments.”
Set the values for the “Create attachment record” action. To set the “Attachment,” set the value to “null,” click “Add dynamic content,” go to the “Expression” tab and type “null.” Select the suggested “null” expression and click “OK.”

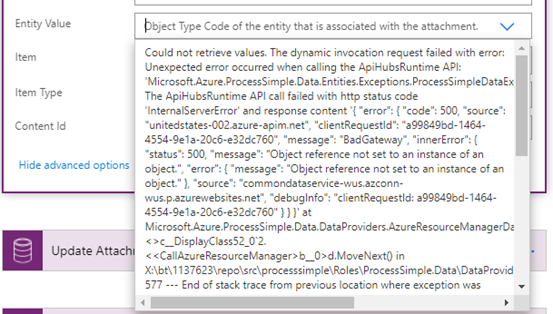
Upon clicking the dropdown, it might show the error below. Scroll down and select “Enter custom value” then manually type “email” in the field.
For “Item,” set the value to the previously created Email Message ID. For “Item Type,” select “emails” from the dropdown list.

The “Create Attachment” action should look like this:
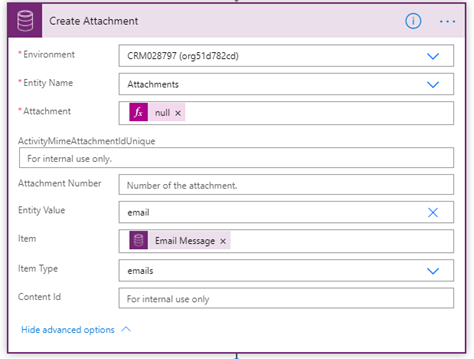
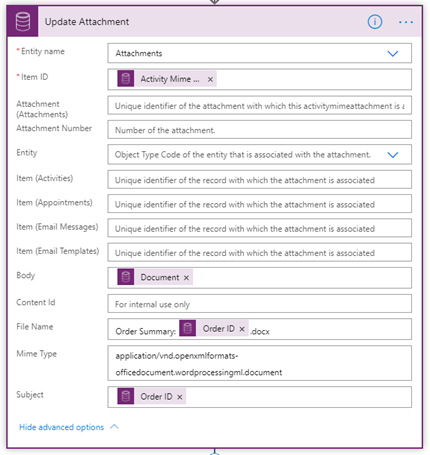
As shown in the screenshot above, there are no fields allotted to set the body/content of the attachment. To achieve this, add a step to update the created attachment record with the attachment content via the new Dataverse (current environment) connector. In the update action, set Entity name to “Attachments – (Activity Mime Attachment),” and Item ID to “Activity Mime Attachment.”

For “Body,” select “Document” from the created Note. The “Mime type” will be based on the type of document your attachment will be. You can refer to a common list of mime types for this. For this example, the document is just a simple word document.

The “Update Attachment” action should look like this:
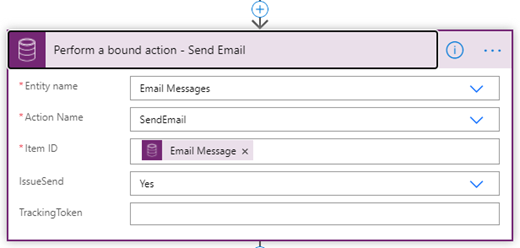
Now that the email message and attachments have been created, set up the action to autosend the email using the Dataverse (current environment) by performing a bound action. Configure “Perform a bound action” with the following values:
- Entity name: Email Messages
- Action name: SendEmail
- Item ID: Email Message ID
- IssueSend: Yes
Optionally, you can also delete the previously created Note entity to free up database space since the note entity record is no longer needed once the email message attachment is created.

Testing
An order record was created to trigger the workflow for autogeneration of the document template which creates the Note attachment record where the attachment will be stored temporarily.
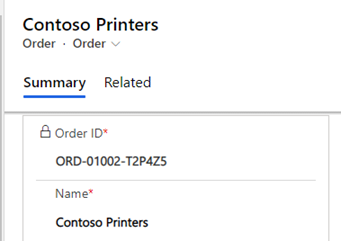
Upon creation of the Note Attachment, the created Power Automate flow will be triggered to send the email message with attachments for the customer and automatically reflects on the order record’s timeline as well.

What’s next?
For more tips and tricks for Dataverse and Power Automate, read this blog about querying data through the Fetch XML Builder. You can also learn about the rest of the Power Platform components and other Microsoft technologies by attending our free webinars. To keep track of Microsoft’s updates, our webinars and blogs, visit and follow us on LinkedIn.
About the Author: Dainty Jen Matundan
Dainty Jen Matundan is a business application specialist at Barhead Solutions.


