Using Power Virtual Agents and Power Automate, you can configure chatbots in Microsoft Teams to send messages proactively. Proactive messaging means that your chatbot in Teams can send a message to a user based on a trigger (for instance, when a tweet is posted, email received or a new blog posted). For a step-by-step guide on how you can do this, you can read this article. In this blog, you’ll learn how to get Power Virtual Agents in Microsoft Teams to send the same proactive message to everyone with the bot installed.
.
1. Create a Dataverse environment for your Team
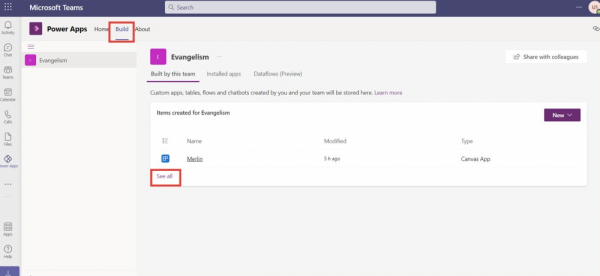
If this is the first time you are building an app/chatbot for a particular Team, you will need to at least create a blank app first. Open the Power Apps app in Teams, and select the Team you’d like to create your chatbot in. Create a blank canvas app, name it, then just leave it. Doing this will give you to option to add other things, such as Dataverse tables, chatbots and flows in the Teams environment. So now if you go into the Build tab in the Power Apps Teams app, you have the ‘See all’ option. After clicking ‘See all’ you will have an option to create a chatbot. This will direct you the Power Virtual Agents app for Teams.
.
2. Create your Power Virtual Agent chatbot and publish it in Teams
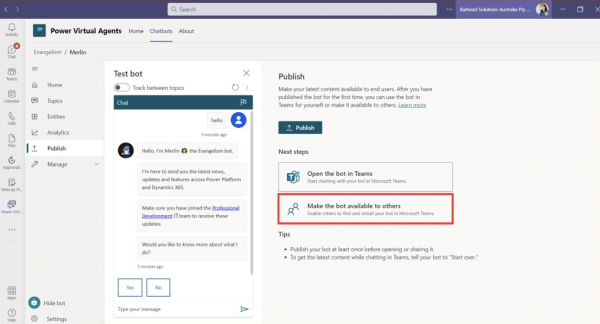
Within Teams, create the chatbot you want. Create any topics you want the bot to handle too. My one is simply just a custom greeting explaining how the bot works. You will notice in the image above that the bot tells the user to join a particular Microsoft Team. This is because in order to for the user to be a recipient of the proactive message, we need to get their email address. You will need to be an admin of the Team in order to connect to it and get the user’s details. This will make more sense when we get to the flow coming up soon.
Publish your bot, and select to ‘make the bot available to others’. Click on Availability options and select the ‘Show to my teammates and shared users’ option. Once published here, the bot will be shown in the app catalog for colleagues to install.
.
3. Create your flow
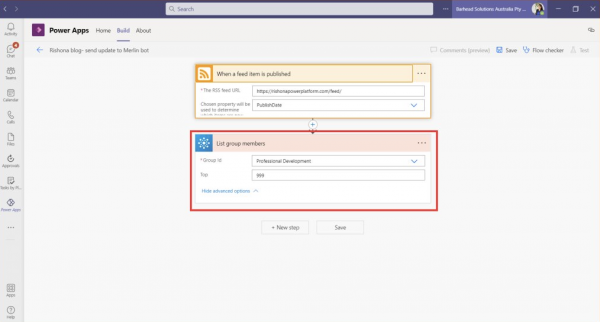
The flows containing the proactive messages need to be created in the same environment as your chatbot. To do this, open the Power Apps app in Microsoft Teams and navigate to your Team that contains the bot. When you go into the ‘See all’ area like we did earlier, you will have the option to create a new automated cloud flow. You can now create your flow, using what ever trigger you like. In this example, I’m using the RSS Feed trigger: When a feed item is published. The flow will notify people when I create a new post on my blog.
Your action after the trigger should be from the Office 365 Groups connector: List group members. For the Group ID, select the Microsoft Team where your bot users would be in. This doesn’t need to be the same Team you created your bot in. However, you will need to be an admin of the Team. You can type 999 in the Top field. This is the maximum number of users it can look for.
.
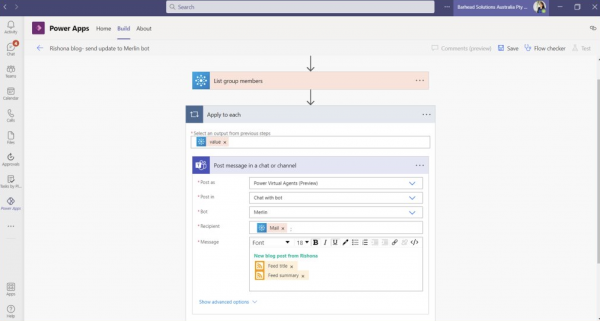
Next is the proactive message. Use the following details for this:
Action: Microsoft Teams- Post message in a chat or channel
Post as: Power Virtual Agents
Post in: Chat with bot
Bot: Select your bot
Recipient: Mail (this is dynamic content from the Office 365 Groups action)
Message: Enter the message you’d like to send
When you set the recipient field, the action will automatically be added in an Apply to Each control.
.
5. Test out your flow
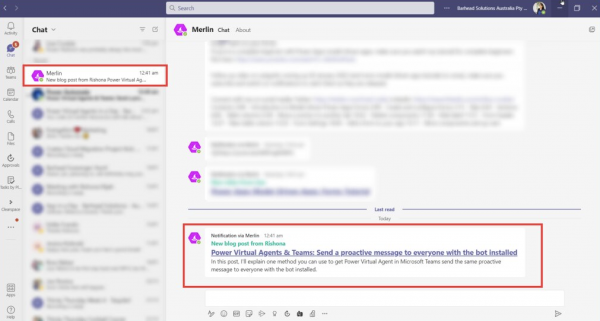
You can save and test your flow once you are done.
Note: The flow will appear as a FAIL for every person in the Team (Office 365 Group) who does not have the bot installed. The proactive message will only be sent to those who both are a member of the Team (Office 365 Group) and have the chatbot added.
Learn how to create low-code, no-code virtual agents
As traditional employee roles change and industries evolve, virtual agents – a tool enabling more seamless collaboration across multiple teams – will become more of a necessity. If you want to learn more about how conversational chatbots can help your organisation, Barhead offers Power Virtual Agents in a Day. During this instructor-led hands-on workshop, you will gain first-hand experience in designing and developing a virtual agent using a no-code graphical interface. To learn more about Barhead’s Power Platform workshops, visit our website.
About the Author: Rishona Elijah
Rishona Elijah is a Microsoft Certified Trainer and is one of our Power Platform experts at Barhead Solutions. She is also a Microsoft MVP, runs regular training and events and is passionate about empowering business users to realise the potential offered by Microsoft Solutions. Her focus is on showcasing how you can leverage the Power Platform to transform your business.


